Secure VNC Access To Your Raspberry Pi Over Internet: A Guide
Are you eager to access your Raspberry Pi remotely via VNC over the internet? Securing your remote access and customizing ports are crucial steps to ensuring a safe and user-friendly experience.
The journey of remotely accessing a Raspberry Pi can feel a bit like navigating a maze. You're likely familiar with port forwarding, the gateway that allows external devices to peek inside your home network. You know that VNC, the remote desktop protocol that lets you control your Pi from afar, typically operates on ports 5800 and 5900 by default. But what if you want to go beyond the basics, to make your connection not just functional, but secure and resilient?
One of the first challenges is the default VNC port. Leaving it as is can make your Pi a target for automated bots, constantly scanning for vulnerabilities. The good news is that changing the port is a relatively straightforward process, offering an immediate layer of obscurity. Then there's the matter of security. How can you protect your connection from prying eyes? The answer lies in methods that mirror the security provided by SSH, the secure shell protocol that's a staple of remote server administration.
- Eloise Joni Richards Denises Journey Chromosome 8 Diagnosis Latest Updates
- Jennifer Lopezs Kids Updates Sweet Moments Latest News
Let's delve into the specifics. The goal here is to customize your VNC setup to create a more robust and secure remote access solution. We aim to not only change the port to a random number, dodging those automated scanners, but also establish secure connections akin to SSH, safeguarding your data and protecting your Pi from unauthorized access.
Imagine the scenario: you're trying to set up port forwarding on your router to allow VNC access to your Raspberry Pi from an external network. You've configured your router to forward, let's say, port 5000 to port 5901 on the Pi. This is a common approach, but it's just the first step. The crucial element is the VNC server configuration itself.
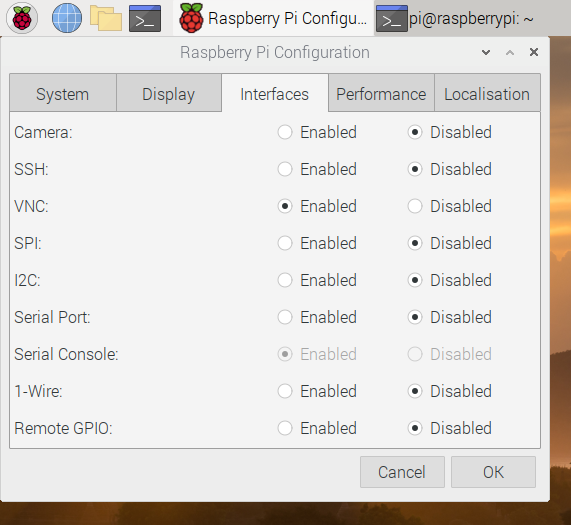
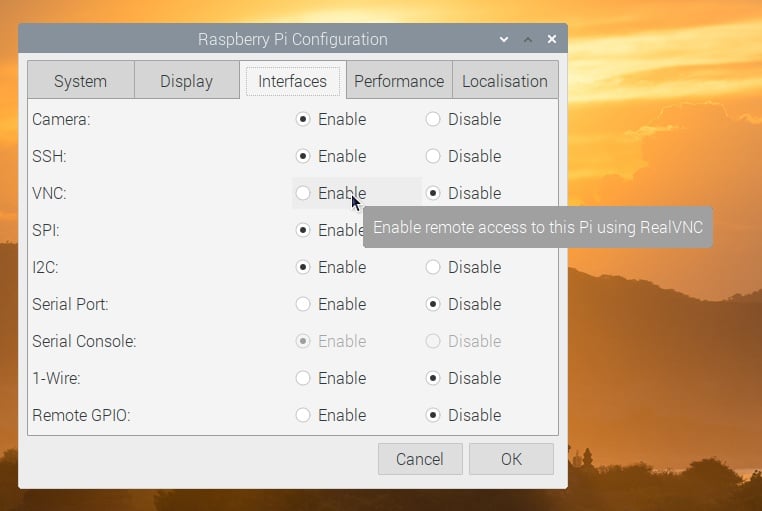
The process involves several key steps. First, you would need to configure your VNC server, like RealVNC Server, which is often pre-installed on the Raspberry Pi OS. This involves accessing the VNC server's options. Locate the VNC icon in the taskbar, right-click it, go to the options, and then navigate to the "Connections" page. Here, you'll find the setting for the port number, typically found at the top right, alongside the "Allow VNC connections over TCP" checkbox.
- Discover Shakespeare In Love A Timeless Classic Still Captivates
- Kurt Cobains Band 7 Letters Crossword Clue Find The Answer
Remember, the default port, 5900, is registered with the Internet Assigned Numbers Authority (IANA). Additional sessions use ports 5901, 5902, and so on. However, for an added layer of security, you should change this default port. When you change the port, ensure that you forward the external port on your router to the new internal port on your Pi. The connection itself will look like this: If you changed the VNC port to, for instance, 6000, and you are on another network, you would then use a VNC client to connect to your Raspberry Pi's public IP address on port 6000.
The default username for VNC on the Raspberry Pi is usually "pi," and the default password is "raspberry." This is a glaring security vulnerability; it is strongly recommended that you change the password immediately after setup to something strong and unique.
For installing a VNC server on Raspberry Pi, you can use the command: (Depending on the specific VNC server) such as `sudo apt install realvnc-vnc-server` if you prefer RealVNC or `sudo apt install tightvncserver` for TightVNC. Ensure the server is running and configured correctly. Once installed, youll be able to connect to your Raspberry Pis VNC server using your Raspberry Pis IP address.
For security, enabling key-based authentication is a recommended step. Use SSH to make changes to the Raspberry Pi's settings securely from another device.
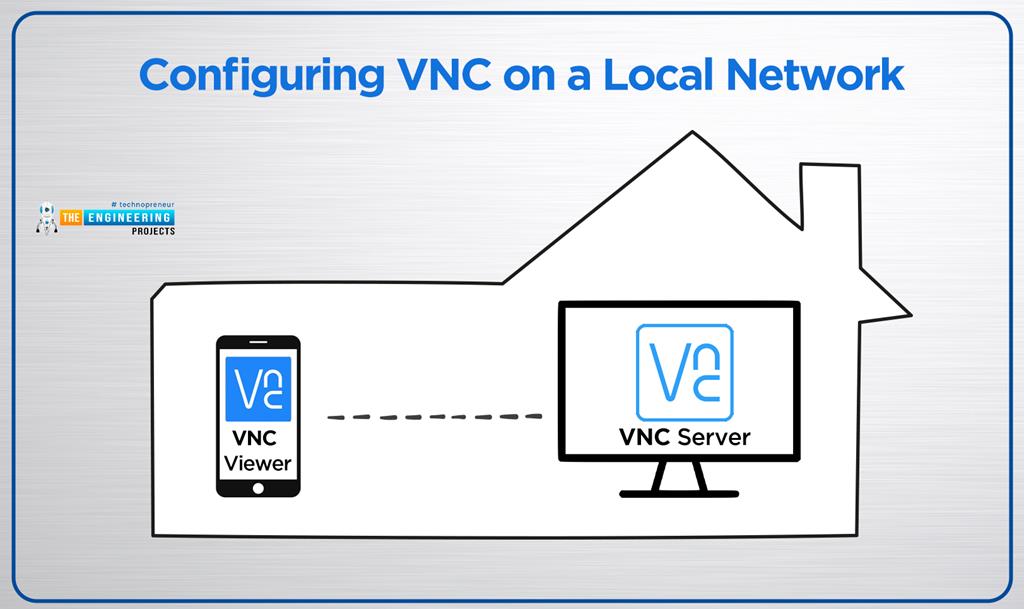
VNC and RDP (Remote Desktop Protocol) are both remote desktop protocols, but they have fundamental differences. The default port for VNC is 5900, and additional sessions often use ports like 5901, 5902, etc. RealVNC Connect is included with the Raspberry Pi OS and uses VNC, allowing you to control your Raspberry Pi remotely. You can also control other desktop computers remotely.
When using VNC, the client transmits keyboard and mouse events to the server, which then executes those events and returns screen updates to the client. If youve changed the port for the VNC server, youll need to use a VNC client to connect to your Raspberry Pi's IP address and the new port you've configured.
If you have a Raspberry Pi 4 Model B, it can transform into a powerful computing platform. You can transform your Raspberry Pi 4 Model B into a powerful computing platform in under 30 minutes. VNC servers, when properly configured, will connect to an X11 desktop session, whether or not an HDMI cable is connected. Best practice is to start with a fresh install of Raspberry Pi OS and follow the instructions while logged in as the default 'pi' user.
The aim here is to install the VNC server software, as well as a web-based HTML5 client onto the Raspberry Pi. It requires the installation of a few packages, such as TightVNC server and screen using the terminal commands.
Here's a table summarizing the key steps and considerations for setting up a secure and customized VNC connection to your Raspberry Pi:
| Aspect | Action/Consideration |
|---|---|
| Port Number | Change the default VNC port (5900, 5901, etc.) to a random, high-numbered port (e.g., 60000-65000) to deter automated bots. |
| Port Forwarding | Configure your router to forward the external port (the one you choose) to the internal VNC port (the new, customized port) on your Raspberry Pi. |
| VNC Server Configuration | Access your VNC server settings (RealVNC Server, TightVNC, etc.) and update the port number within the server's configuration. |
| Password Security | Immediately change the default "pi" user password to a strong, unique password. |
| SSH Tunneling (Recommended) | Use SSH tunneling to create a secure, encrypted connection to your Raspberry Pi. This adds an extra layer of security by encrypting all VNC traffic. |
| Firewall Configuration | Consider configuring a firewall on your Raspberry Pi to restrict access to the VNC port. |
| VNC Client Configuration | When connecting with a VNC client, specify your Raspberry Pi's IP address, the external port you set up on your router, and potentially the SSH tunnel settings. |
| Update and Upgrade | Keep your Raspberry Pi's operating system and installed software up to date to patch potential vulnerabilities. |
| IP Address | Determine your Raspberry Pi's IP address. |
| VNC Server Installation | Install a VNC server on your Raspberry Pi (RealVNC Server, TightVNC, etc.) |
Remember the specifics. Change the default VNC port, and create a more robust and secure remote access solution. This will create a more secure VNC setup. You will be able to configure a virtual desktop.
To set up your Raspberry Pi for the first time, you'll need to ensure the VNC server is enabled. When you set up VNC, you should make a note of the IP address for establishing a connection.
By implementing these steps, you can greatly enhance the security and usability of your remote access setup. Whether you're a seasoned tech enthusiast or just starting with your Raspberry Pi, these measures will allow you to control your device remotely and make sure your connection is safe.
Detail Author:
- Name : Nikita Ortiz
- Username : yheathcote
- Email : hrogahn@yahoo.com
- Birthdate : 1992-11-23
- Address : 8636 Zora Plains Henristad, KY 73780
- Phone : (651) 457-5022
- Company : Anderson, Schaefer and Jenkins
- Job : Etcher and Engraver
- Bio : Consequatur ipsa non ea beatae. Qui impedit perferendis enim. Et quidem animi non non consequatur qui voluptas.
Socials
twitter:
- url : https://twitter.com/sallie.hammes
- username : sallie.hammes
- bio : Nam aut et temporibus necessitatibus quibusdam voluptatem in. Consequatur ut debitis quo odit sed porro neque. Qui harum id earum et et fuga.
- followers : 349
- following : 116
facebook:
- url : https://facebook.com/sallie_official
- username : sallie_official
- bio : Dolor dolores dolores est eaque. Numquam repellat sapiente inventore et neque.
- followers : 524
- following : 1781
linkedin:
- url : https://linkedin.com/in/sallie.hammes
- username : sallie.hammes
- bio : Consectetur velit animi assumenda facere.
- followers : 4110
- following : 1451
tiktok:
- url : https://tiktok.com/@hammes2009
- username : hammes2009
- bio : Qui sapiente ipsa eum omnis. Officia dolore qui neque laboriosam est.
- followers : 345
- following : 2817
